 Visualization
Tiered Napkin Stand SVG, Three Step Coaster Display Laser Cut File, Straw Station Rack DXF
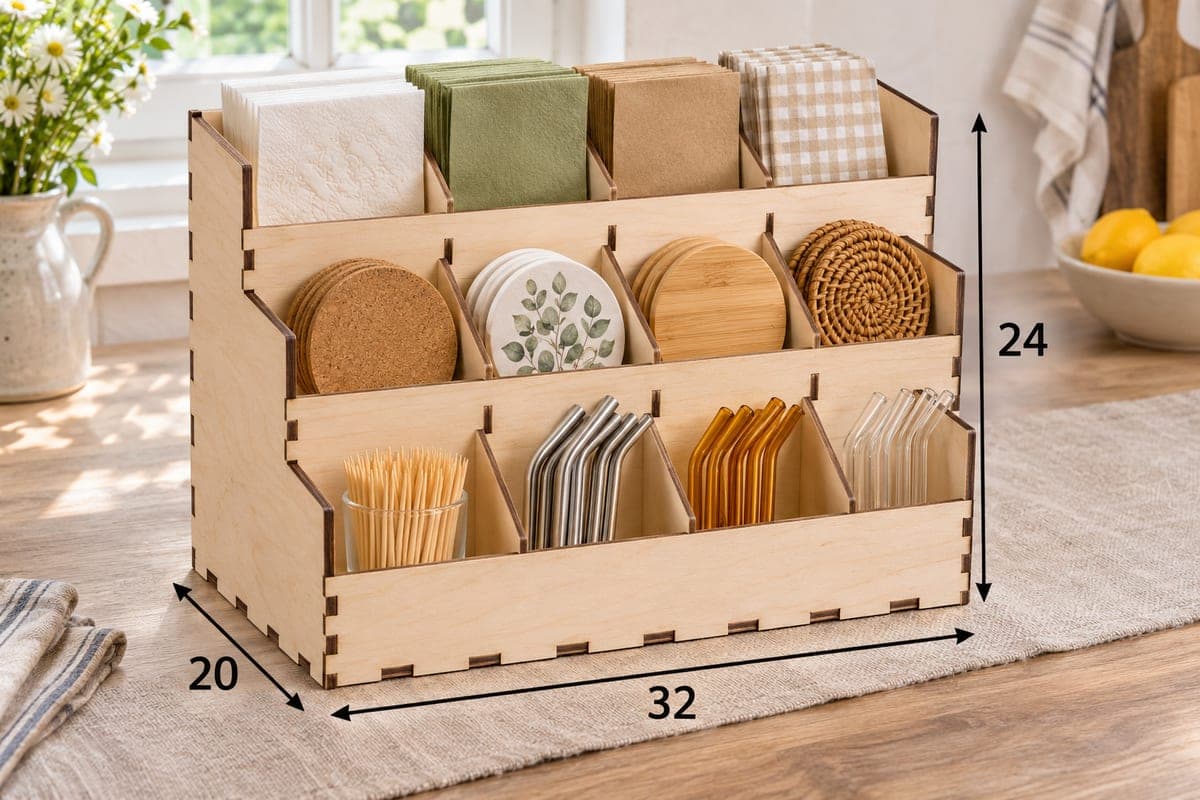
A free three-tier napkin stand with steps rising to the back, each split into four slots, for 12 slots in all that hold napkins, coasters, straws and toothpicks. The download contains SVG and DXF files for 3, 4, 5 and 6 mm plywood; the stand is 320 × 200 × 240 mm (12.60 × 7.87 × 9.45 in) and has 18 pieces that join with tabs and slots.
- Formats
- SVG, DXF
- Outer size (W × D × H)
- 320 × 200 × 240 mm (12.60 × 7.87 × 9.45 in)
- Parts
- 18
- Material thickness
- 3, 4, 5 or 6 mm plywood (a file for each)
- Layout size (3 mm file)
- 1,300 × 361 mm
- Cut length
- 11.84 m
- Est. time, 10 W diode (3 mm)
- 39 min 28 s
- Est. time, 40 W CO2 (3 mm)
- 16 min 27 s
- Layers
- CUT only, no engraving
Free account required to download
How to make it
- 01Choose the SVG or DXF for your plywood thickness and test one divider slot on an offcut before the full run.
- 02Cut the 18 numbered pieces in two or more jobs, since the 3 mm layout is 1300 mm long.
- 03Set the two sides upright, add the shelves, step boards, front board and brace from the bottom up, then press in the nine dividers by their engraved numbers.
- 04Oil the stand, let it dry, and fill the top tier with napkins, the middle with coasters and the bottom with straws and toothpicks.
Three tiers, four slots each
At 240 mm tall this stand works like a small shop display. Each step carries a shelf with three dividers, so every tier has four slots. The photo uses the top row for four napkin designs, from white embossed to sage green, kraft and gingham, the middle row for coasters in cork, ceramic, bamboo and woven rattan, and the bottom row for toothpicks plus metal, amber glass and clear glass straws. Guests see every choice at once, which is why stands like this suit a buffet, a bar cart or a home coffee station.
Cutting the 18 pieces
The 3 mm layout is 1300 × 361 mm, which most hobby lasers cannot take in one go. Cut the two sides and the boards in one job and the shelves and nine dividers in another. Small part numbers are engraved on each piece, so you can match the dividers to their shelf later. Time for the 3 mm file: about 39 min 28 s on a 10 W diode, about 16 min 27 s on a 40 W CO2, about 7 min 54 s on a 100 W CO2. Diode owners should stay with 3 or 4 mm; 6 mm makes the long shelves very stiff but needs several passes.
Building it square
Stand both side panels up, then fit the shelves, step boards, front board and the rear brace between them, working from the bottom up. Push the dividers in last, checking the engraved numbers. Glue the brace and shelves if the stand will carry heavy glass straws or ceramic coasters. A coat of hard-wax oil protects it from damp napkins and drink rings.
Wedding planners can fill it as a drinks-table station, and makers can sell it with coordinating napkin packs as a hostess gift.
Questions about this file
What goes on which tier?
Tall stacks such as folded napkins look best on the top step, flat coasters in the middle, and straws or toothpicks at the front where they are easiest to grab.
Why is each piece of the stand numbered?
They are engraved part numbers that show where each piece goes. Sand them off afterwards or turn them to face inward.
Can I use it for something besides napkins?
Yes, the 12 slots take tea bags, sugar sachets, nail polish bottles or sample jars just as well.
Is 3 mm plywood strong enough for this stand?
For napkins and paper straws, yes. For heavy glass straws and ceramic coasters, cut the 4 or 5 mm version or glue the shelves.
Where would a logo go?
The front board is 320 mm wide, a good spot for a cafe name or a wedding monogram. Add your own engraving layer to the file before cutting.
Similar files