
Laser Cut Sliding Lid Box: Rails, Clearance and a Smooth Fit
A laser cut sliding lid box has a flat lid that glides along two rails or grooves inside the side walls, with no hinge or catch. As a typical starting point, leave about 0.2-0.5 mm more channel height than the lid thickness and about 0.5-1 mm of total side play, then test on scrap, because plywood sold as 3 mm is often 2.8-3.2 mm. Sand the lid edges, not the rails, and rub them with wax.
The first sliding lid I ever cut went in for about two centimetres, then stopped with a squeak that sounded almost offended. I pushed harder, the side wall bowed, and for a moment the whole box looked ready to pop apart. Five minutes with sandpaper and a candle stub saved it, and taught me that a sliding lid lives or dies on a gap thinner than a business card.
A laser cut sliding lid box is the old pencil-box idea: a flat panel that runs along two rails or grooves and closes the top with no hinge, magnet or catch. This guide explains how the lid is carried, how much clearance to leave for 3, 4, 5 and 6 mm plywood, how to test it on scrap, how to sand and wax it, and which free files in our library use the design.
How a sliding lid box works
Every sliding lid needs three things: a support under the lid so it does not drop into the box, a guide at the sides so it runs straight, and one open end so it can slide in and out.
In our sliding lid files, two narrow rails run along the inside of the side walls and the flat lid glides on them. The front wall is a little lower than the others, so the lid can slide out over it, and the inner dividers stand a little lower than the walls so the lid passes over them without catching. You can push the lid halfway back to reach one section while the rest stays covered, or pull it right off when you refill the box.
Rails or grooves?
On a router table you would cut a groove into each wall. On a laser you can only cut through the sheet or engrave its face, so makers use a few tricks instead.
| Design | How it is made on a laser | Good points | Watch out for |
|---|---|---|---|
| Rails | Thin strips cut from the same sheet, fixed along the inside of the side walls | Only through-cuts, fast, easy to adjust by sanding | Rails take a few millimetres of inside space; glue must stay off the lid path |
| Laminated groove | Each wall is built from two or three layers; the middle layer is narrower and leaves a channel | A true groove with crisp edges | Double the material and cutting time, and the layers must line up exactly |
| Engraved groove | A channel is engraved into the inner face of the wall | One layer only | Slow, depth changes with wood density, charred floor makes the lid stick |
Sliding lid clearance for 3, 4, 5 and 6 mm plywood
There are two gaps that matter. The first is the height gap: the channel the lid runs in must be a little taller than the lid is thick. The second is the side play: the lid must be a little narrower than the space between the walls or rails, so it does not jam when the box is slightly out of square.
The trap is that plywood is rarely its nominal thickness. A sheet sold as 3 mm is often 2.8-3.2 mm, and thickness can change between batches. The laser adds its own twist: kerf, the strip of wood the beam burns away, is typically 0.1-0.25 mm in 3 mm plywood, so parts come out a hair smaller than drawn unless the file compensates.
The values below are typical starting points, not rules. Measure your sheet with a caliper and test on scrap before you cut the whole box.
| Plywood | Typical variation from the label | Channel height over lid thickness | Total side play across the lid |
|---|---|---|---|
| 3 mm | about ±0.2 mm, sometimes more | +0.2 to +0.4 mm | 0.5-1.0 mm |
| 4 mm | about ±0.2 mm | +0.3 to +0.5 mm | 0.6-1.0 mm |
| 5 mm | about ±0.2-0.3 mm | +0.3 to +0.5 mm | 0.8-1.2 mm |
| 6 mm | about ±0.3 mm | +0.4 to +0.6 mm | 0.8-1.5 mm |
Here is a real number from our files. The oil bottle box with a sliding lid is 280 mm long outside, and its 3 mm lid measures 273.4 mm. Take away two 3 mm walls and roughly 0.6 mm of side play is left, which sits right inside the typical range.
Pro tip: Lacquer and oil add thickness to an edge. If you plan a film finish, aim for the looser end of the range, or leave the lid edges and the rails bare.
Test the lid fit on scrap before the full cut
A sliding lid box can take 20-35 minutes to cut on a 10 W diode. A test piece takes two. Here is the routine:
- Measure the sheet with a caliper in three or four places, not just one corner.
- Pick the matching file. Our sliding lid boxes come in separate versions for 3, 4, 5 and 6 mm plywood. Use the one closest to your real sheet and never scale the file to fit, because scaling changes the slot widths and the rail gap with it.
- Cut a test slot and a short rail section from an offcut, plus a strip of lid edge about 40 mm long.
- Slide the strip along the rail. It should move with light finger pressure and not rock up and down.
- Adjust the lid edge with sandpaper, or move to the next file thickness if the gap is far off.
- Cut the full box only when the test strip feels right.
Assembly order that keeps the lid running
Build the walls on the base, fix the rails inside the side walls, slide in the dividers, then try the lid before any glue goes on. On several of our files the lower front wall goes on last, after you have checked the slide, because the lid has to pass over it.
Common mistake: Gluing the whole box and only then trying the lid. If the lid binds, the box is now fixed in its crooked shape, and you are left sanding a lid that is fine while the real problem is a rail glued a millimetre too high. Always dry fit, test the slide, and only then glue the corners, keeping glue well away from the rails.
When something is off, this table finds it quickly:
| What you feel | Likely cause | Fix |
|---|---|---|
| Lid will not start into the channel | Lid thicker than the channel, or charred edges | Sand the lid edges, wipe off soot with a damp cloth |
| Tight only in the middle | A wall bows inward, or a rail is not straight | Check the box is square, re-seat the rail before gluing |
| Smooth when dry, stiff after finishing | Finish built up on the lid edges | Sand the edges back lightly, then wax |
| Lid rattles or lifts at one end | Too much height gap, or a thinner sheet than the file | Use the next thinner file, or shim the rail with a strip of paper |
| Squeaks | Bare wood rubbing on bare wood | Rub the lid edges and rails with candle wax or paraffin |
| Sticks in humid weather | Plywood swelled slightly | Sand a touch more and seal both faces of the lid |
Sanding, waxing and finishing a sliding lid
Sand the lid, not the rails. The lid is one part you can reach from every side, while rails glued inside a box are awkward and easy to round over. Start with 180 grit on the long edges, finish with 240, and test after every few strokes. It is surprising how little it takes.
Then wax. A candle stub, paraffin or paste wax rubbed along the lid edges and the rails makes the lid glide and quiets the squeak. Finish the outside of the box with oil or lacquer if you like, but leave the rail surfaces bare, so nothing builds up where the lid runs. Sealing both faces of the lid evenly helps keep it flat.
Free sliding lid box files to cut
All of these come as SVG and DXF with separate versions for 3, 4, 5 and 6 mm plywood, and they join with tabs and slots. Cutting times are for the 3 mm file.
| File | Outer size (mm) | Parts | 10 W diode | 40 W CO2 |
|---|---|---|---|---|
| Sliding lid tea box, 3 sections | 280 × 160 × 80 | 10 | about 23 min 50 s | about 9 min 56 s |
| Sliding lid cutlery box | 280 × 280 × 60 | 9 | about 29 min 02 s | about 12 min 06 s |
| Six-section sliding lid condiment box | 310 × 160 × 90 | 11 | about 29 min 20 s | about 12 min 14 s |
| Eight-section sliding lid sauce box | 340 × 160 × 100 | 12 | about 33 min 51 s | about 14 min 06 s |
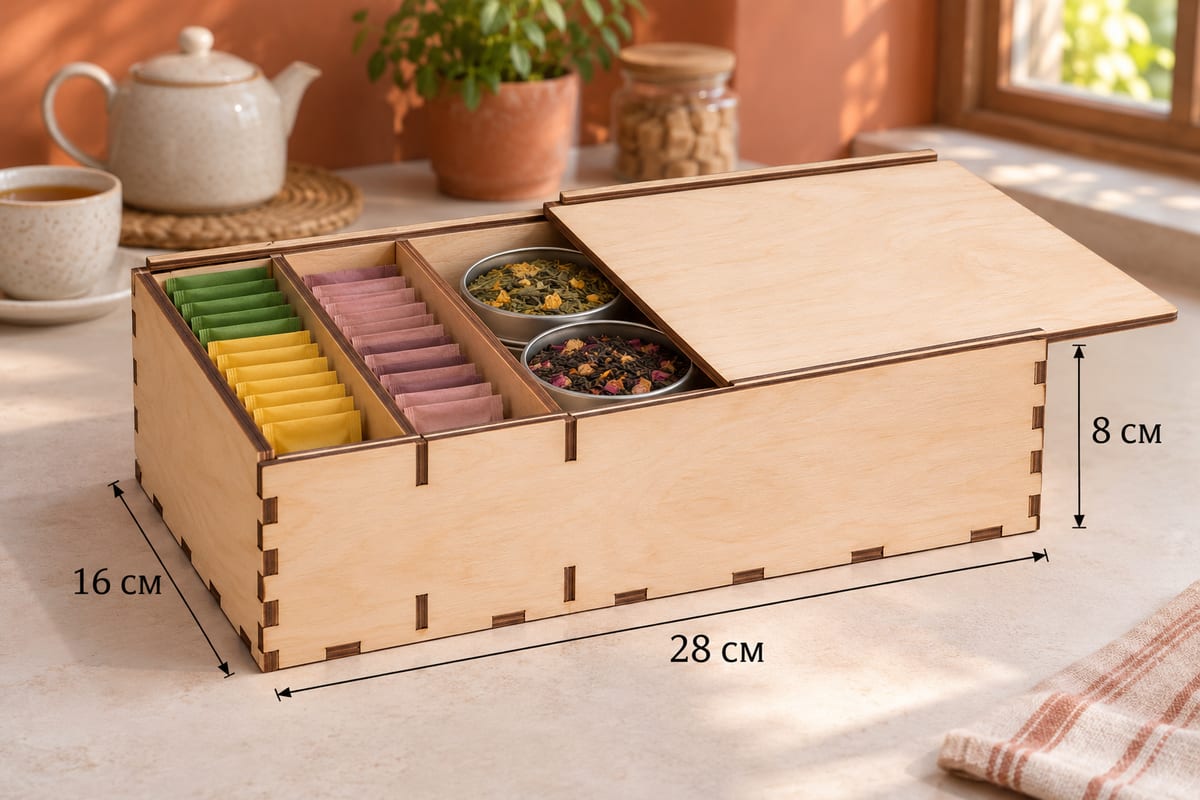 Sliding Lid Tea Box, 3 SectionsOuter size (W × D × H) 280 × 160 × 80 mm (11.02 × 6.30 × 3.15 in)Parts 10Est. time, 10 W diode (3 mm) 23 min 50 sEst. time, 40 W CO2 (3 mm) 9 min 56 sSVG · DXF →
The tea box is the easiest place to start: three sections, a lid on two rails, and a size that suits a kitchen shelf. The same 280 × 160 × 80 mm body appears in our sliding lid spice box, the oil bottle box and the napkin and straw box, so once one lid runs well, the others will too.
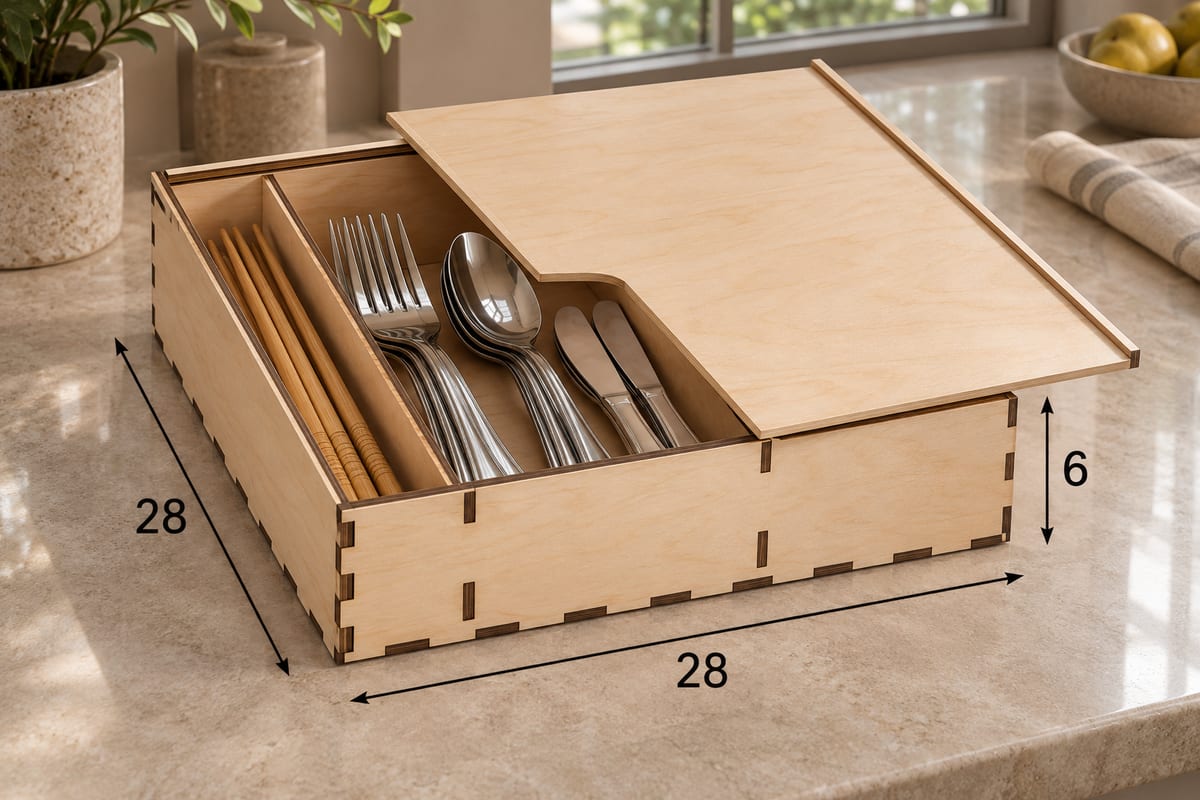 Sliding Lid Cutlery BoxOuter size (W × D × H) 280 × 280 × 60 mm (11.02 × 11.02 × 2.36 in)Parts 9Est. time, 10 W diode (3 mm) 29 min 02 sEst. time, 40 W CO2 (3 mm) 12 min 06 sSVG · DXF →
The cutlery box is square, with a big lid close to 280 mm each way. Its 3 mm layout is 1140 × 636 mm, so on a 300 mm bed the base and lid each go on their own sheet.
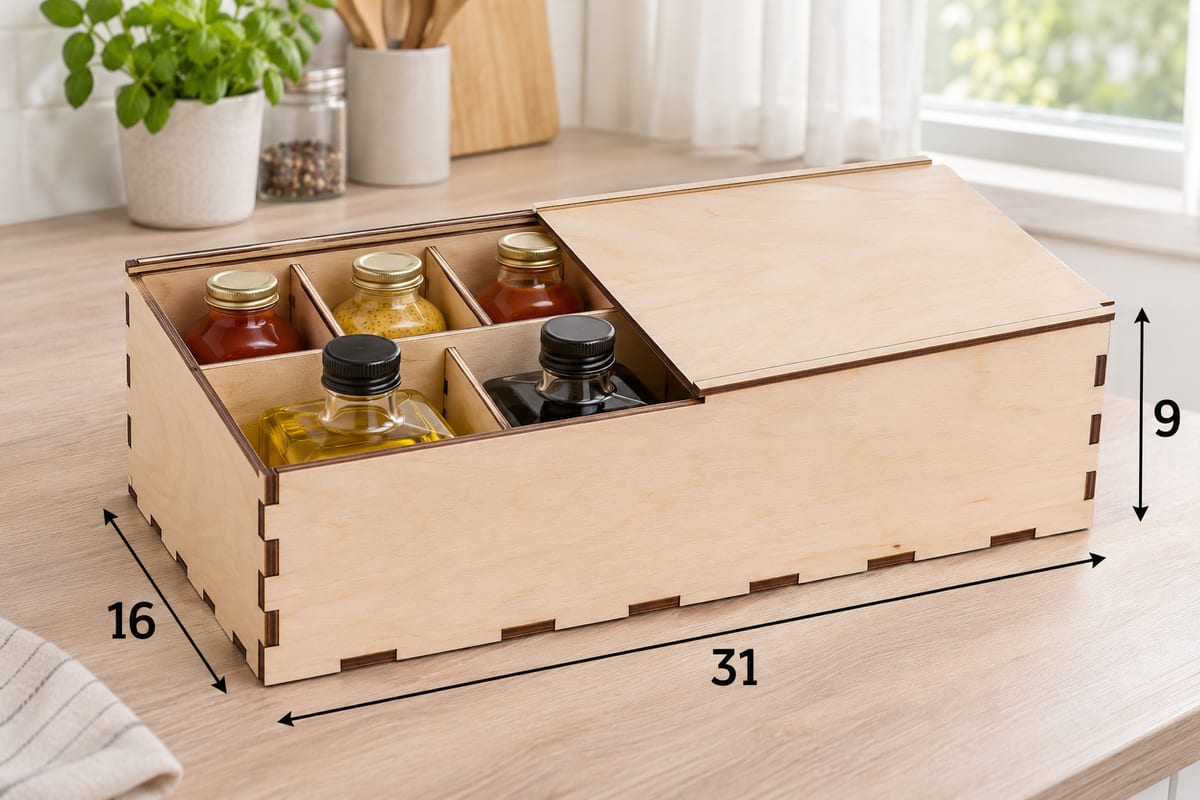 Sliding Lid Condiment Box, 6 SectionsOuter size (W × D × H) 310 × 160 × 90 mm (12.20 × 6.30 × 3.54 in)Parts 11Est. time, 10 W diode (3 mm) 29 min 20 sEst. time, 40 W CO2 (3 mm) 12 min 14 sSVG · DXF →
The condiment box splits the inside into two rows of three. It is a good second project, because the longer lid shows straight away whether your rails are parallel.
More lidded boxes live in the tea and coffee, spice and condiment categories. If you would rather have a lid that swings open, read our guide to the laser cut hinged box without hardware.
Next step
Measure your plywood, download the sliding lid tea box in the matching thickness, and cut only a test slot and a short rail first. When that strip glides with a light push, cut the full box, dry fit it, wax the lid, and enjoy that first smooth slide shut.
Read next: Laser Cut Hinged Box Without Hardware and Laser Cut Tea Box.
Questions and answers
How much clearance does a sliding lid need?
As a typical starting point, make the channel 0.2-0.5 mm taller than the lid is thick and leave about 0.5-1 mm of total side play. Plywood thickness and kerf vary, so always test a short piece on scrap first.
Should I sand the lid or the rails when the lid sticks?
Sand the lid edges. They are easy to reach and easy to sand evenly, while rails inside a box are awkward and easy to round over. Wax both afterwards.
Can I scale a sliding lid box file to a different size?
Scaling changes the slot widths and the rail gap along with the outline, so the joints and the slide stop fitting. Use the file made for your plywood thickness, or draw a new size with the slot widths kept at your material thickness.
Will a sliding lid stay closed on its own?
A plain sliding lid has no catch, so it stays in place by friction and gravity. Carry the box level, or choose a hinged design if the lid must not slide out.
Can I cut the sliding lid from acrylic?
Yes, a 3 mm acrylic lid on a plywood box looks good, but acrylic does not compress like wood, so test the slide carefully. Clear acrylic needs a CO2 laser, because diode lasers cannot cut it well.