 Visualization
Sliding Lid Box SVG, Napkin Storage Box Laser Cut File, Covered Straw and Coaster Organizer DXF
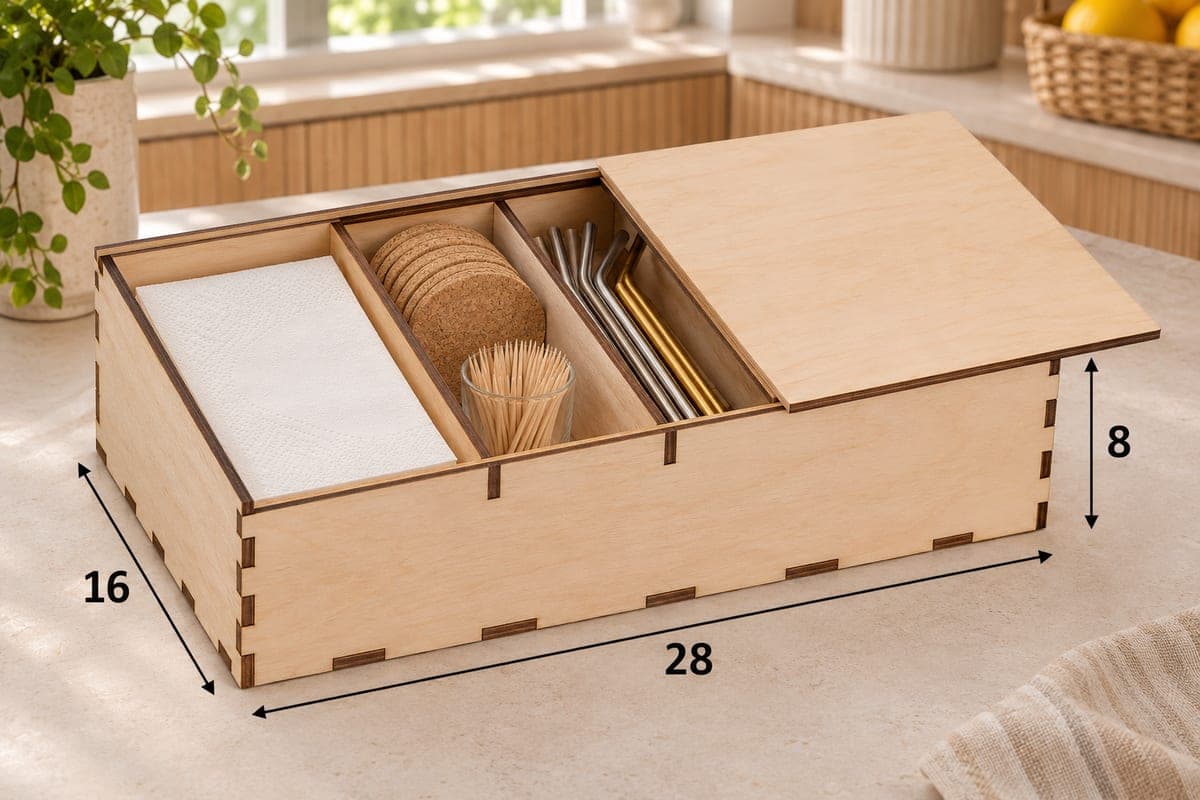
A free covered napkin box with a flat lid that slides in along two rails, holding three compartments for napkins, coasters and straws. The download has SVG and DXF files for 3, 4, 5 and 6 mm plywood; the box measures 280 × 160 × 80 mm (11.02 × 6.30 × 3.15 in) and is built from 10 pieces that join with tabs and slots.
- Formats
- SVG, DXF
- Outer size (W × D × H)
- 280 × 160 × 80 mm (11.02 × 6.30 × 3.15 in)
- Parts
- 10
- Material thickness
- 3, 4, 5 or 6 mm plywood (a file for each)
- Layout size (3 mm file)
- 926 × 416 mm
- Cut length
- 7.15 m
- Est. time, 10 W diode (3 mm)
- 23 min 50 s
- Est. time, 40 W CO2 (3 mm)
- 9 min 56 s
- Layers
- CUT only, no engraving
Free account required to download
How to make it
- 01Choose the file for your plywood thickness and test-cut one slot plus a short length of rail to check the lid will run freely.
- 02Cut the 10 parts, moving the lid and base to a second sheet on a narrow bed.
- 03Build the base, back and sides, fit a rail along the inside of each side wall, add the two dividers and the front, then slide the lid in.
- 04Wax the lid edges, finish the outside, and fill the three compartments with napkins, coasters and straws.
Why a lid helps on the table
Open caddies collect dust and kitchen grease. This one closes. The lid slides along two thin rails fixed inside the side walls and can be pushed back halfway, as in the photo, to reach one section while the others stay covered. There is no hinge or catch, just the sliding panel. Inside, two dividers make three compartments across the 280 mm length: a wide one for paper towels or folded napkins, a middle one for round cork coasters and a glass of toothpicks, and a narrow one at the right for steel and gold straws.
Cut sizes and laser times
Cutting time for the 3 mm file is about 23 min 50 s on a 10 W diode, about 9 min 56 s on a 40 W CO2 and about 4 min 46 s on a 100 W CO2. The 3 mm layout is 926 × 416 mm; if your bed is around 400 mm wide, cut the lid and base on one sheet and the walls on another. Thick 6 mm stock takes a diode many passes, so 3 or 4 mm is the easy choice for this box.
Assembly order and finish
Join the base, back and both sides first, and fit the two rails along the inside of the side walls. Fit the dividers, add the front, then test the lid before any glue dries. Wax the lid edges with a candle stub if it sticks. A clear matte lacquer keeps the wood from staining near a sink.
The flat lid is a good place for a family name or a restaurant logo engraved by you. Sold with a set of reusable straws inside, the box makes a thoughtful eco-friendly gift.
Questions about this file
How does the lid stay on?
It rides on two rails inside the box, so it cannot lift off while closed. You slide it out toward one end to open.
The lid is too tight. What should I do?
Sand the lid edges a little or rub them with wax. If your plywood is thicker than the file you cut, recut with the next thickness up.
Can I keep cloth napkins in it?
Yes, the wide left section takes folded cloth napkins, and the lid keeps them clean between dinners.
Do I need glue for the rails?
A little wood glue along each rail is best, because the lid pulls on them every time it moves. The other joints can stay dry.
Is a sliding box safe to put food in?
Use it for wrapped items such as napkins, straws and sugar sachets. For loose food, finish the inside with a food-safe oil and let it cure fully first.
Similar files