 Visualization
Op Art Panel DXF, Bubble Sphere Room Divider Laser Cut File, Dot Pattern Wall Panel SVG, 3D Illusion Screen
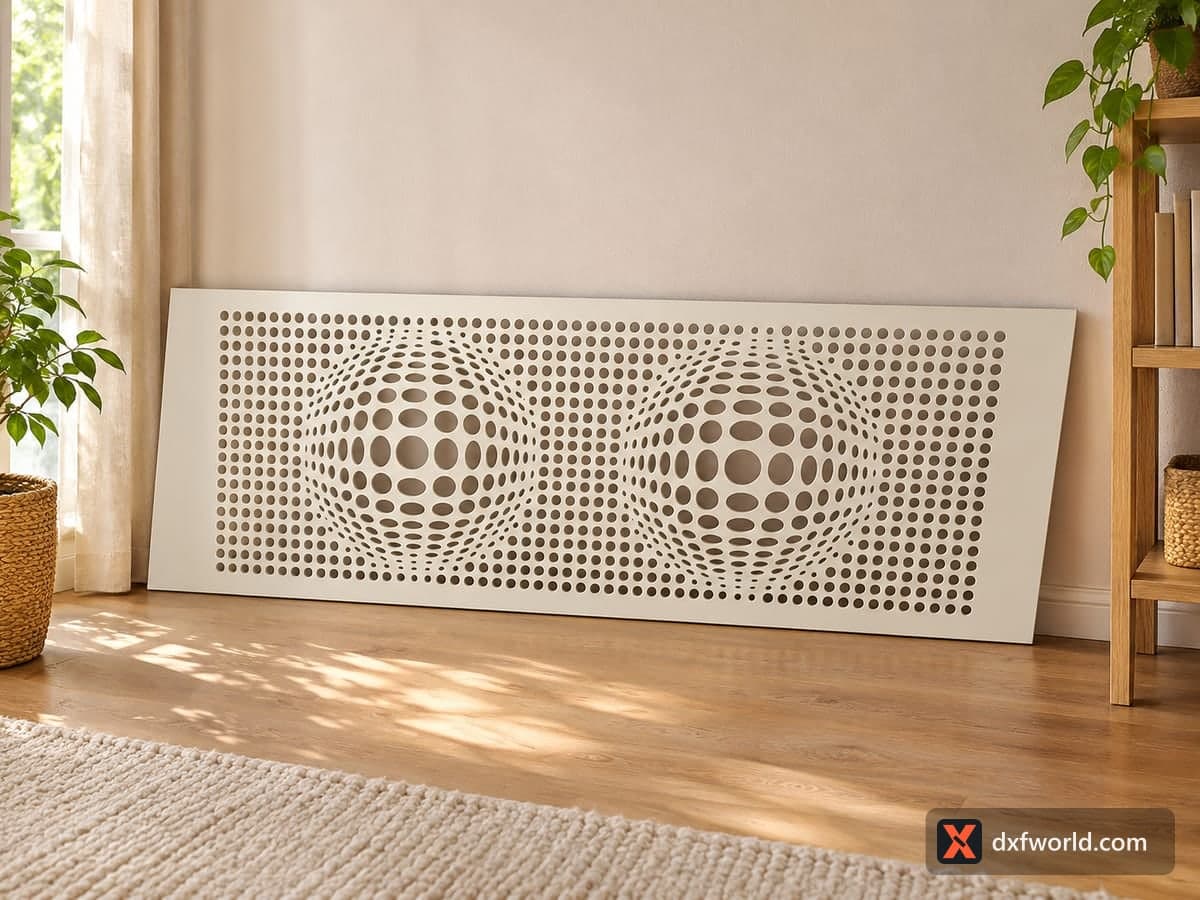
A tall rectangular panel pierced with rows of round holes that stretch into ovals and grow larger in two places, so the board seems to bulge out into two spheres. The free SVG and DXF download measures 700 × 1950 mm (27.56 × 76.77 in) and holds 991 closed hole outlines inside a plain border, with no engraving. Use it upright as a room divider or screen, or turn it on its side as a radiator cover or headboard panel.
- Formats
- SVG, DXF
- Size
- 700 × 1,950 mm (27.56 × 76.77 in)
- Material
- Plywood, MDF, acrylic or metal (scale to your piece)
- Cut length
- 76.90 m
- Est. time, 10 W diode (3 mm)
- 256 min 19 s
- Est. time, 40 W CO2 (3 mm)
- 106 min 48 s
- Layers
- CUT only, no engraving
Free account required to download
How to make it
- 01Size the board for the radiator, wall or door it will cover, keeping the tiniest ovals near the spheres wider than your router bit.
- 02Run every hole before the outer border, in 6 mm MDF, plywood or acrylic.
- 03Clear the drop-outs, sand the hole edges and fill any burn marks before painting.
- 04Prime and paint, then frame it, hinge it to a second panel or fix it over the radiator.
How the illusion works
The panel is a single board with a solid border and a field of holes. In the plain areas the holes are even circles in a straight grid. Around two centres the circles swell, flatten into ovals and curve along the outline of a ball, which tricks the eye into reading two raised spheres. Nothing is layered: the depth comes only from hole size and spacing, so the effect works in any colour, though a light board against a darker wall or a lamp behind it shows it best.
Cutting tips
With almost a thousand holes, cut order matters more than power. Let your software cut inside shapes first and keep the outer border for last, so the board never shifts on the bed. On a CNC router, pick a bit that fits the smallest ovals near the sphere edges; on a laser, 6 mm MDF or plywood is a good middle ground for a full-size screen. Thin bridges between neighbouring holes get weak if you shrink the panel a lot, so check the gaps before scaling below half size.
Where to use it
The photo shows the panel lying on its side against a wall, which is how it works as a radiator cover or a long headboard. Upright, two or three panels hinged together make a folding screen, and a single one fits a door insert or a cabinet front. Paint it white for a clean look or black for strong contrast, and seal MDF before it goes near a radiator.
Questions about this file
Can I use it horizontally?
Yes. Rotate the file 90 degrees so the two spheres sit side by side, the way the photo shows it, for a radiator cover or headboard.
Why do the holes change shape?
The circles stretch into ovals and grow toward each sphere centre. That gradient is what makes the flat board look curved.
Will a diode laser manage it?
A smaller version in 3 mm plywood, yes, but nearly a thousand holes take a long time. Large screens go faster on a CO2 laser or a CNC router.
Is it safe over a radiator?
Use moisture-resistant MDF or plywood, seal every cut edge and leave a gap behind it so warm air can rise through the holes.
Can I back it with light?
Yes, an LED strip or panel behind it makes the spheres glow and strengthens the 3D effect.
Similar files