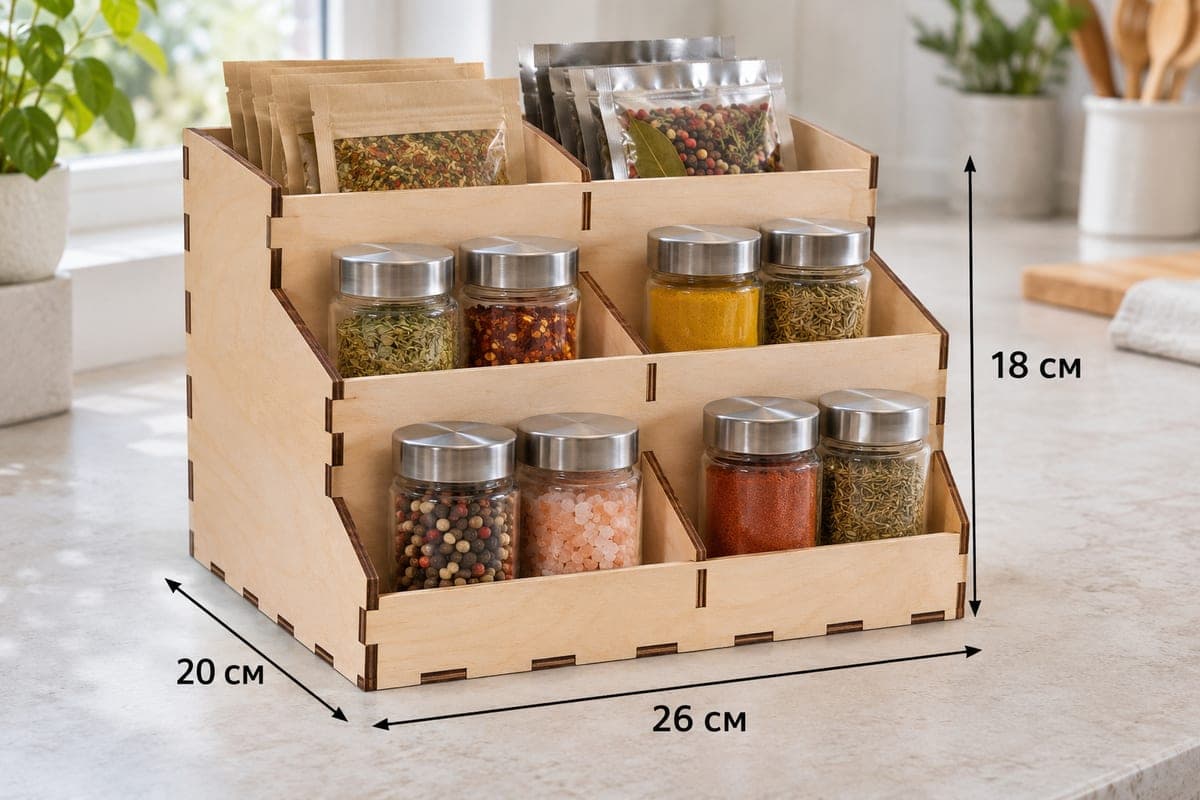
 Visualization
Tiered Spice Rack SVG, 3 Step Spice Jar Stand Laser Cut File, Wooden Countertop Spice Shelf DXF
A free laser-cut file for a three-step countertop spice rack whose steps rise toward the back, each step split by one divider into two bays, for six bays in total. It measures 260 × 200 × 180 mm (10.24 × 7.87 × 7.09 in), uses 12 plywood pieces joined with tabs and slots, and comes as SVG and DXF in separate versions for 3, 4, 5 and 6 mm plywood, with small part numbers engraved to guide assembly.
- Formats
- SVG, DXF
- Outer size (W × D × H)
- 260 × 200 × 180 mm (10.24 × 7.87 × 7.09 in)
- Parts
- 12
- Material thickness
- 3, 4, 5 or 6 mm plywood (a file for each)
- Layout size (3 mm file)
- 1,060 × 313 mm
- Cut length
- 8.55 m
- Est. time, 10 W diode (3 mm)
- 28 min 30 s
- Est. time, 40 W CO2 (3 mm)
- 11 min 52 s
- Layers
- CUT only, no engraving
Free account required to download
How to make it
- 01Choose the file for your sheet (3, 4, 5 or 6 mm) and test one slot on an offcut before running the full rack.
- 02Cut the twelve numbered parts, spreading them over two or three sheets if your bed is shorter than 1060 mm.
- 03Lay one side down, insert the shelves, step boards and back brace by their engraved numbers, then press the second side on top and stand the rack upright.
- 04Slot the three short dividers into the steps, sand any burnt corners and seal the wood before loading jars.
How the three steps are used
Each step is a shallow shelf with a lip board in front, and every row is cut in half by one short divider. In the photo the bottom and middle steps carry two jars per bay, so eight jars stand in two staggered rows and every label faces you. The top step is the deepest, which makes it a good home for kraft and foil pouches stood upright behind the jars. Because each row sits higher than the one in front, nothing hides behind a taller bottle.
Cutting the twelve parts
The 3 mm layout is 1060 × 313 mm, longer than most diode and desktop CO2 beds, so plan on two or three sheets: the two side panels on one, the shelves, step boards and brace on the others. Cutting time for the 3 mm file is about 28 min 30 s on a 10 W diode, about 11 min 52 s on a 40 W CO2 and about 5 min 42 s on a 100 W CO2. A 10 W diode handles 3 mm in one or two passes; for 5 or 6 mm birch use a stronger laser or several slow passes.
Every piece carries a small engraved number, so you can match it to the parts list. Stand one side panel flat, push in the shelves and step boards in number order, add the brace at the back, then cap it with the second side. Drop the three dividers in last. The rack holds together dry; glue the side joints if it will carry heavy glass jars.
Ways to use or sell it
- A matched pair, one for spices and one for teas, sells well as a kitchen set.
- Coffee corners use it for syrups and sugar jars.
- Finish with clear lacquer so oily fingerprints wipe away.
Questions about this file
What size jars suit the steps?
The shelves are about 76–84 mm deep and each bay is roughly half of the 260 mm width, so two small spice jars stand side by side as in the photo. Pouches go best on the top step.
Why are there numbers on the pieces?
Small part numbers are engraved so you can tell the similar shelves and step boards apart. They are the only engraving in the file and sit on hidden faces once it is built.
Can I scale the rack to fit inside a cabinet?
You can change the width, but the tab slots must stay the width of your material, so resize the outline without stretching the slots. Check that the height still clears the shelf above.
Is 3 mm plywood strong enough for glass jars?
For a few small jars it works, but 4 or 5 mm gives steadier steps when every bay is full. Glue on the side joints adds stiffness too.
Can I add a shop logo to the front board?
Yes, the front lip board is a plain panel, so you can place your own engraving there before cutting. The download itself contains only cut lines and part numbers.
Similar files