 Visualization
Food Bag Organizer With 6 Sections SVG, Trash Bag Roll and Zip Bag Holder Laser File, Kitchen Wrap Tray DXF
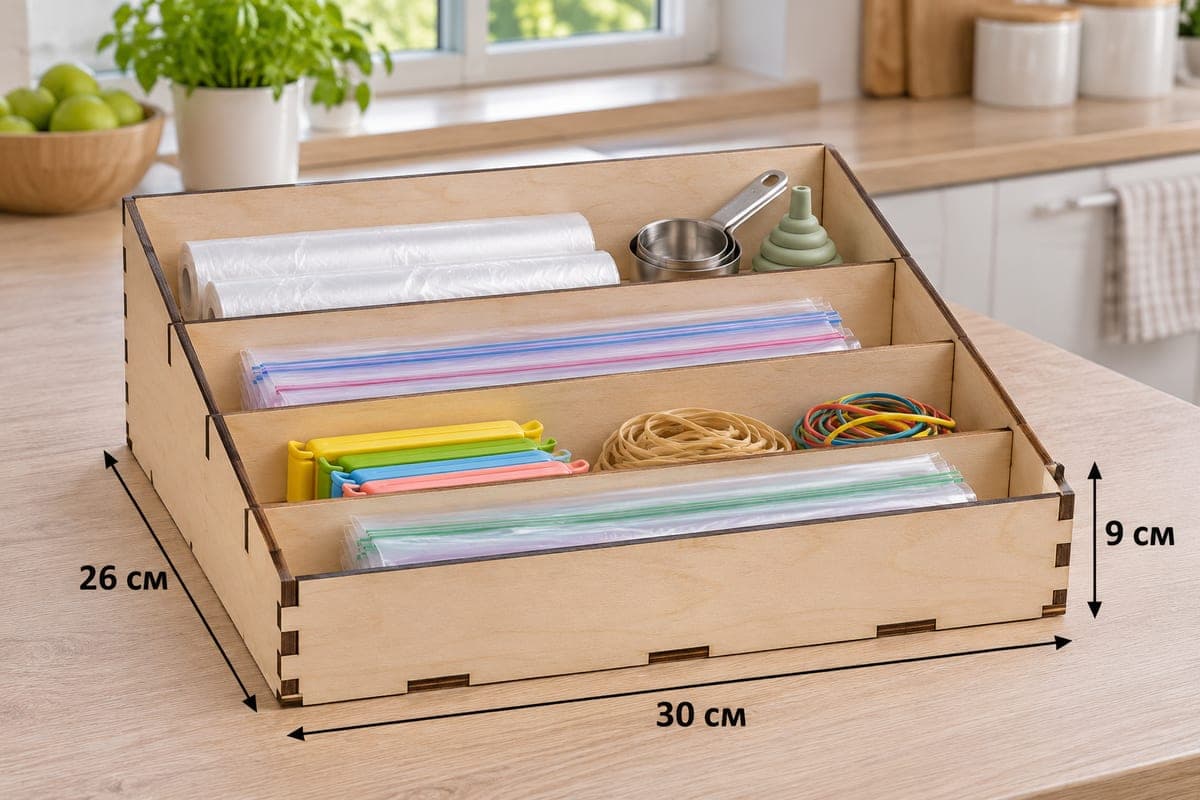
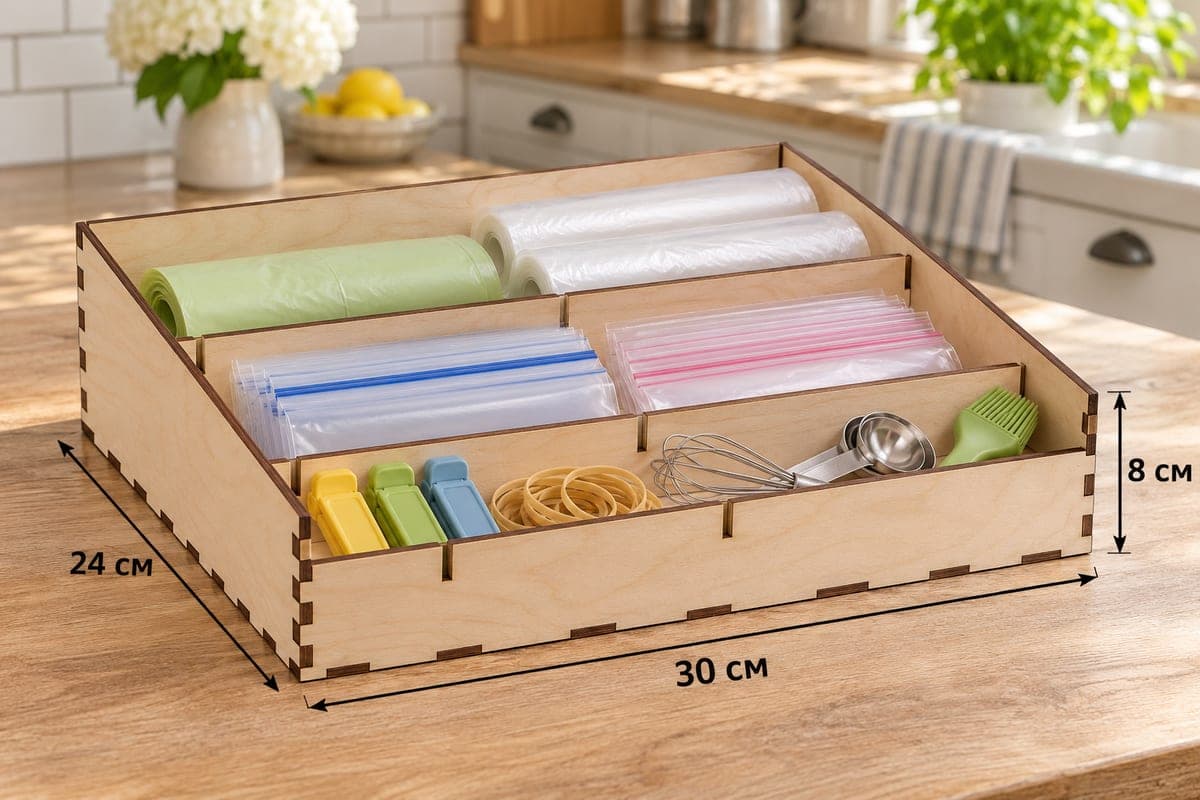
A three-row kitchen tray that holds roll bags and cling film in a full-width back lane, two kinds of zip bags in the middle row and small tools in three front cups. It ships as SVG and DXF with separate files for 3, 4, 5 and 6 mm plywood, measures 300 × 240 × 80 mm (11.81 × 9.45 × 3.15 in), and is cut from 10 pieces into 6 compartments. The side walls slope to a 40 mm front, the box joins with tabs and slots, and it is a free download.
- Formats
- SVG, DXF
- Outer size (W × D × H)
- 300 × 240 × 80 mm (11.81 × 9.45 × 3.15 in)
- Parts
- 10
- Material thickness
- 3, 4, 5 or 6 mm plywood (a file for each)
- Layout size (3 mm file)
- 1,148 × 332 mm
- Cut length
- 7.08 m
- Est. time, 10 W diode (3 mm)
- 23 min 37 s
- Est. time, 40 W CO2 (3 mm)
- 9 min 50 s
- Layers
- CUT only, no engraving
Free account required to download
How to make it
- 01Download the file for your plywood (3, 4, 5 or 6 mm) and cut one short divider to check it slides into the cross divider slot.
- 02Cut all ten pieces, splitting the roughly 1148 mm layout if your laser bed is smaller.
- 03Assemble base, sides and back, add the rear cross divider with its one divider, then the front cross divider with two, and close with the front wall.
- 04Sand the edges, apply oil or varnish, and fill the back lane with rolls, the middle with zip bags and the front cups with clips.
One, two, three
The rows multiply as they come forward. The back lane runs the full width and is meant for rolls: bin liners, freezer bag rolls or cling film. Below it, a middle row split in two takes zip bags in two sizes, for example blue-seal bags on the left and pink-seal bags on the right. The front row has three small cups for bag clips, rubber bands, and a whisk, measuring spoons and a pastry brush. The two cross dividers are about 52 mm and 64 mm tall, so the rows step up like a small grandstand.
Cutting the ten parts
The file holds front, back, two sloped sides, base, two cross dividers and three short dividers. The 3 mm layout is about 1148 × 332 mm, so owners of 300 or 400 mm beds should spread the parts over two or three sheets. Expect about 23 min 37 s for the 3 mm file on a 10 W diode, about 9 min 50 s on a 40 W CO2 and about 4 min 43 s on a 100 W CO2. Thicker 5 and 6 mm boards need more power or extra passes.
Build in this order: base, sides, back, then the taller rear cross divider with its single short divider, then the front cross divider with its two short dividers, and the 40 mm front last. No glue is needed, but a drop at each corner keeps it square for years.
Finishing and gifting
Sand the cup edges smooth and seal with oil or water-based varnish. Packed with a roll of bin bags, two boxes of zip bags and a set of clips, it makes a practical gift for someone moving into a first flat, and it is an easy craft fair seller.
Questions about this file
Will a roll of bin liners fit in the back lane?
Yes, the back lane spans the whole inside width and suits a roll of bin liners, freezer bags or cling film lying sideways.
Can I make the tray bigger?
Resize the outline freely, but keep the slots at your real plywood thickness; scaling the slots along with everything else breaks the fit.
My plywood measures 3.2 mm. Which file do I use?
Start with the 3 mm file and test one slot. If it is too tight, add a small offset to the slots in your software, or try the 4 mm file and check the gap.
Can I cut it from acrylic for a modern kitchen?
Clear or frosted acrylic works. Cut a test joint first and glue the corners with acrylic cement, because acrylic does not grip tabs the way plywood does.
What finish works best for a kitchen tray?
A hardwax oil or two coats of water-based varnish protect against splashes and sticky fingers; let it cure fully before loading it.
Similar files