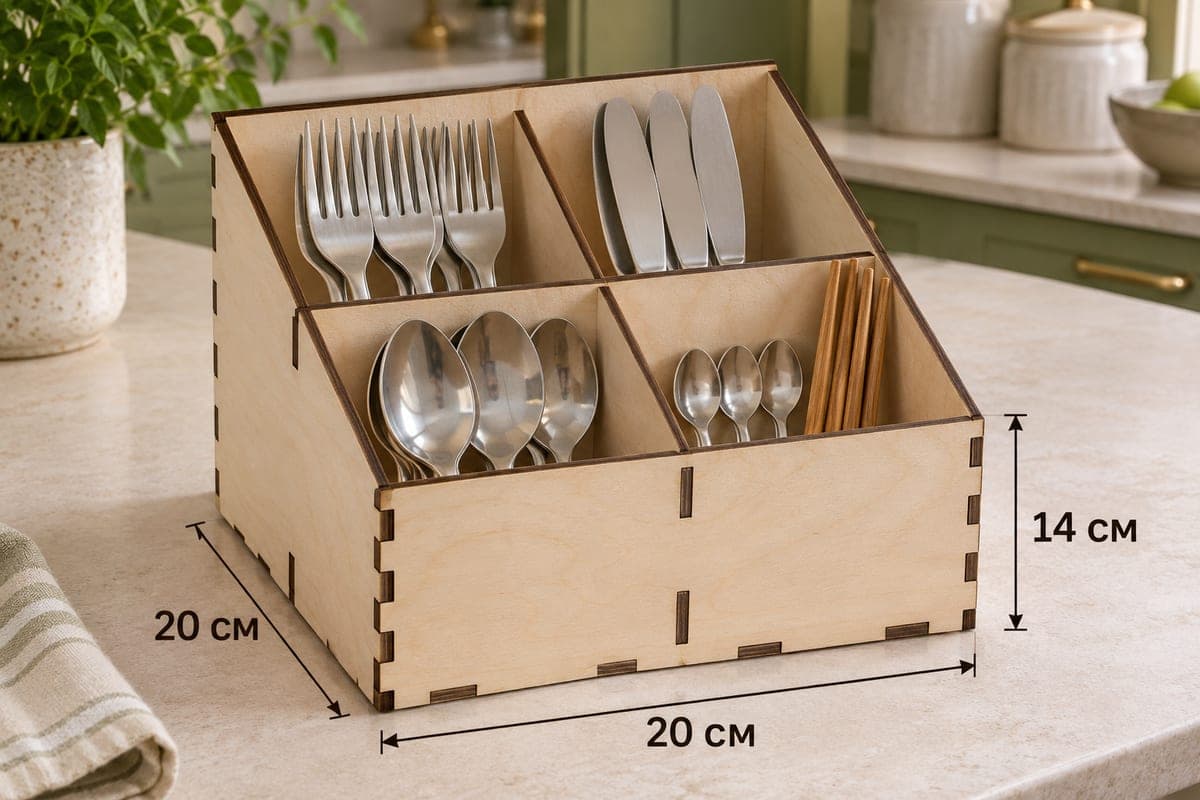
 Visualization
Two Tier Silverware Caddy SVG, Square Cutlery Holder Laser Cut File, Stepped Utensil Organizer DXF
A square, two-tier silverware caddy with four compartments: two tall ones at the back and two lower ones in front, so every handle stays visible. It comes as SVG and DXF with separate files for 3, 4, 5 and 6 mm plywood, measures 200 × 200 × 140 mm (7.87 × 7.87 × 5.51 in), has 8 pieces and assembles with tabs and slots. The files are a free download.
- Formats
- SVG, DXF
- Outer size (W × D × H)
- 200 × 200 × 140 mm (7.87 × 7.87 × 5.51 in)
- Parts
- 8
- Material thickness
- 3, 4, 5 or 6 mm plywood (a file for each)
- Layout size (3 mm file)
- 820 × 352 mm
- Cut length
- 5.37 m
- Est. time, 10 W diode (3 mm)
- 17 min 55 s
- Est. time, 40 W CO2 (3 mm)
- 7 min 28 s
- Layers
- CUT only, no engraving
Free account required to download
How to make it
- 01Open the folder for your plywood thickness and cut one slot as a fit check.
- 02Cut the base, tall back, lower front, two sloped sides, the cross divider and the two short dividers.
- 03Slot the two short dividers onto the cross divider, set that frame into the base, then add the sides, back and front.
- 04Sand the stepped edges, seal, and stand forks and knives in the back pockets with spoons and teaspoons in front.
A stepped, four-section layout
The caddy is a 200 mm square and 140 mm tall at the back. A cross divider splits it into a back row and a front row, and each row is halved by its own divider. The back divider reaches the full 140 mm height while the front row is lower, and the front wall drops to 77 mm, so the caddy steps down toward you. In the photo forks and table knives stand in the tall back pockets, dinner spoons and a mix of teaspoons and bamboo chopsticks sit in front.
Long pieces go in the back where the tall walls support them; short pieces go in front where they are easy to grab. Nothing hides behind anything else, which makes this a practical caddy for a kitchen island or a picnic basket.
Cutting and putting it together
The 3 mm layout is just 820 × 352 mm, so it fits most diode and CO2 beds in a single run. The 3 mm file takes about 17 min 55 s on a 10 W diode, about 7 min 28 s on a 40 W CO2 and about 3 min 35 s on a 100 W CO2. If you choose 5 or 6 mm for extra weight, a diode will need several passes per piece.
Join the two short dividers to the cross divider first, so the inner frame stands on its own, then set it into the base and wrap the walls around it. Glue is optional. Sand the stepped top edges smooth and finish with oil or lacquer.
Selling square caddies
Square caddies photograph well on a styled table. Offer it in natural birch and in a stained version, or as a set with a matching napkin caddy for outdoor dining.
Questions about this file
What goes in the tall back pockets?
Longer pieces such as dinner forks, table knives and serving spoons; the back row is supported by the full 140 mm back wall.
Can I scale it into a larger caddy?
Yes, but resize the panels while keeping every slot at the plywood thickness; a uniform scale of the whole file will make the joints loose.
Which thickness suits a caddy carried to the table?
4 mm is a good middle ground for a hand-held caddy; 3 mm is lighter and quicker, 6 mm heavier and very stable.
Is it suitable for outdoor dining?
With an exterior-grade lacquer or several coats of oil it handles a summer of patio meals; bring it inside when it rains.
Can I stain it darker?
Yes; stain the parts before assembly so no colour gets into the slots, then seal over the stain once the caddy is together.
Similar files