 Visualization
Daisy SVG, Groovy Retro Daisy Laser Cut File DXF, Spring Flower Ornament, Teacher Appreciation Gift
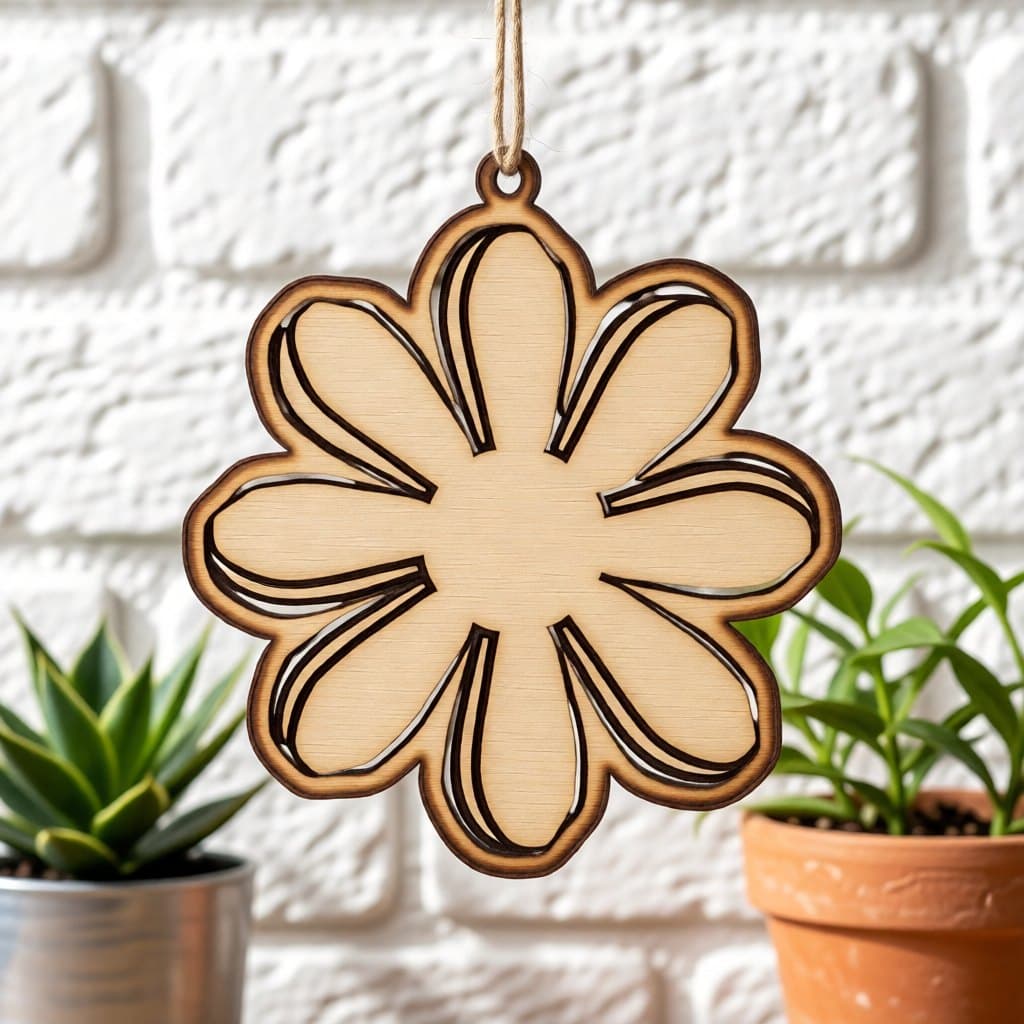
A cheerful cartoon daisy with eight rounded petals, each with a dark crescent along one edge that makes the petal look curled. The big round centre and most of each petal are bare wood, which leaves room to paint or to engrave a name. It measures 90 × 100 mm (3.54 × 3.94 in) and has a 4 mm hole above the top petal.
- Formats
- SVG, DXF
- Size
- 90 × 100 mm (3.54 × 3.94 in)
- Parts
- 1
- Hanging hole
- 4 mm
- Cut length
- 0.38 m
- Engraving area
- 14.5 cm²
- Material
- 3 mm plywood, MDF or acrylic
- Est. time, 10 W diode
- 3 min 40 s
- Est. time, 40 W CO2
- 1 min 20 s
- Est. time, 100 W CO2
- 51 s
- Per 300 × 400 mm sheet
- 9 pcs
- Per 600 × 400 mm sheet
- 18 pcs
- Layers
- CUT (red), ENGRAVE (black)
- License
- CC0 1.0: free for personal and commercial use
Free account required to download
How to make it
- 01Import the daisy at 90 × 100 mm and type any name or word into the centre circle as its own engrave layer.
- 02Engrave the crescents with a fill setting; they are the only dark areas, so the run is short.
- 03Do one test cut of the outline; the soft curves rarely need extra passes in birch.
- 04Paint the petals and centre, let them dry fully, and tie a ribbon through the top hole.
A 70s daisy with a twist
Eight long, rounded petals spread around a large circle, like the daisies on retro stickers and 1970s kitchen tins. Instead of outlines, each petal has a dark crescent engraved down one side, as if its edge were curling up towards you. The crescents all lean the same way around the flower, so the daisy seems to spin slightly. The centre and the middle of every petal stay plain, and the cut runs a little outside the petals, keeping the wavy flower edge.
Easy engraving, open space
Only the crescents are engraved, so the job is short: estimated 3 min 40 s using a 10 W diode, 1 min 20 s using a 40 W CO2 and 51 s using a 100 W CO2 (3 mm plywood). The outline has gentle curves and nothing fragile, which makes it a good starter file for a new laser or a classroom demo. The plain centre is the natural spot for a name, an initial or a short word like 'thanks'. Paint the petals white and the centre yellow for a classic daisy, or go pink and orange for a groovy look.
Where daisies sell
- End-of-year teacher gifts, with the teacher's name in the centre.
- Spring and summer market stalls, sold in bunches of mixed colours.
- Retro party decor and 70s birthday garlands.
- Gift tags for bouquets or potted plants at a garden shop.
Questions about this file
Can I put a name in the middle of the daisy?
Yes. Add text in a separate engrave layer inside the round centre before you cut. Short names fit comfortably at full size; for longer ones, scale the whole daisy up a little.
Is this design good for beginners?
It is one of the easier files to start with: the engraving is light, the outline has no thin parts, and small focus errors are hard to see on the crescent shapes.
Which colours give the retro look?
White petals with a yellow centre is the classic daisy. For a 70s feel use mustard, orange and pink, or paint the bare petals in pastels and leave the crescents dark.
Can the daisy be a magnet or a bouquet pick?
Yes. Glue a magnet on the back or a wooden skewer under one petal. The flat, sturdy shape takes glue well.
How quickly can I make a class set?
A 300 × 400 mm sheet holds 9 daisies and a 600 × 400 mm sheet holds 18. With so little engraving, a whole class set is a short job on a CO2 laser.
Similar files